Blame | Last modification | View Log | Download
# Plugins/Smart Virtual Thermostat[Jump to navigation](https://www.domoticz.com/wiki/Plugins/Smart_Virtual_Thermostat.html#mw-head)[Jump to search](https://www.domoticz.com/wiki/Plugins/Smart_Virtual_Thermostat.html#p-search)**Smart Virtual Thermostat python plugin for Domoticz**IMPORTANT NOTE: This is Beta software, so you use it at your own risk…Current version: 0.4.4 (October 7, 2018)Author: Logread (aka 999LV on Github)## Contents- [1 Plugin objective:](https://www.domoticz.com/wiki/Plugins/Smart_Virtual_Thermostat.html#Plugin_objective:)- [2 Prerequisites:](https://www.domoticz.com/wiki/Plugins/Smart_Virtual_Thermostat.html#Prerequisites:)- [3 Installation:](https://www.domoticz.com/wiki/Plugins/Smart_Virtual_Thermostat.html#Installation:)- [4 Parameters:](https://www.domoticz.com/wiki/Plugins/Smart_Virtual_Thermostat.html#Parameters:)- [5 Updating to last version:](https://www.domoticz.com/wiki/Plugins/Smart_Virtual_Thermostat.html#Updating_to_last_version:)## Plugin objective:Easily implement in Domoticz an advanced virtual thermostat based on time modulation and self learning of relevant room thermal characteristics (including insulation level) rather then more conventional hysteresis methods, so as to achieve a greater comfort. It is a port to Domoticz of the original Vera plugin from Antor as described at [[1\]](http://www.antor.fr/apps/smart-virtual-thermostat-eng-2/?lang=en). All the technical explanations about the logic behind the smart virtual thermostat are given there.In addition, the thermostat offers the following features:1. Normal/Eco modes, for instance for night v.s. day temperature control2. Pause mode, for instance to stop heating when a door or window is open for a certain time**IT DOES NOT DEAL WITH COOLING ! ONLY HEATING IS SUPPORTED !**This plugin requires the following input sensors and output switch(es) to operate:1. Inside Temperature Sensor(s): Mandatory - One or more Domoticz temperature devices providing ambient temperature data to the thermostat2. Outside Temperature Sensor(s): Optional - One or more Domoticz temperature devices providing outside temperature data to the thermostat3. Heater Switch(es): One or mode Domoticz switch devices driving heaters/boiler(s) on an on/off basis.This plugin will create the following devices in Domoticz:1. "<plugin-name> - Thermostat Control": sets the status of the thermostat (off, auto mode, forced mode)2. "<plugin-name> - Thermostat Mode": sets the mode for temperature control (normal, economy), using the relevant setpoint (see below for setpoint devices). This can be used for instance with a timer to switch between night and day operation.3. "<plugin-name> - Thermostat Pause": if set to "On", will force the thermostat in pause mode after a delay (see Parameters section below) and conversely resume normal operation if set to "Off". This can be switched for instance with a small blockly or lua domoticz script to pause heating when a window or door is open.4. "<plugin-name> - Setpoint Normal": sets the temperature target for the normal mode5. "<plugin-name> - Setpoint Economy": sets the temperature target for the economy mode6. "<plugin-name> - Thermostat Temp": displays the current ambient temperature (average of the values of the internal temperature sensors as provided in the hardware parameters). That device is "hidden" by default and can obviously be added to your domoticz dashboard from the "Setup/Devices" menu.Here is are screenshots of all these devices:[](https://www.domoticz.com/wiki/File:SVT_Switches.PNG)[](https://www.domoticz.com/wiki/File:SVT_SetPoints.PNG)[](https://www.domoticz.com/wiki/File:SVT_Temp.PNG)In addition, the plugin will create one User Variable in your domoticz setup (labeled "<plugin-name>-InternalVariables") that will be used to permanently store some critical persistent variables required by the plugin such as the heating and insulation coefficients it learns and uses). If you manually delete this user variable and immediately restart domoticz, the plugin will recreate it with its default parameters and all past learning will be lost). If you mess with it by editing it manually (there should be no need for that) and the format is no longer a valid python dictionary that the plugin can work with, then default values will be used by the plugin again and all past learning will be lost.## Prerequisites:1. The Domoticz system on which the plugin runs must be version 3.7418 minimum (otherwise Domoticz might crash due to a bug in the python plugin framework).2. The python plugin system must be installed (see the instructions at https://www.domoticz.com/wiki/Using_Python_plugins ).## Installation:The below instructions are for a Raspberry Pi Linux platform… I have not tested this on other platforms (e.g. Windows) but I assume a bit of search on the Domoticz forum can help you…1. Open a shell session2. Navigate to the directory holding your Domoticz installation (typically ~/domoticz)3. Perform the following commands within the shell:```cd pluginsmkdir SVTsudo apt-get updatesudo apt-get install gitgit clone https://github.com/999LV/SmartVirtualThermostat.git SVTcd SVTsudo chmod +x plugin.pysudo /etc/init.d/domoticz.sh restart```Now connect to Domoticz with your browser. If not already done, configure domoticz to allow new devices (settings page) and then go to the “Setup/Hardware” page and select the “Smart Virtual Thermostat” type from the drop-down list. You should now see the following:[](https://www.domoticz.com/wiki/File:HWPage041.JPG)1. Enter the IP address of the domoticz system on your LAN (or '127.0.0.1' (without brackets or quotes) if the plugin runs on the same machine as the target domoticz. Contrary to the screenshot, do not use 'localhost' as this can yield errors on some systems).2. Enter the Port used to access the domoticz system at the above IP (e.g. 8080)3. Enter the username / password required by domoticz (if not disabled)4. Enter the relevant thermostat parameters required or optional, as per the "Parameters" section below.5. “Add” the new hardware…In case something does not work, enable the “Debug” mode for the plugin in the “Settings/Hardware” page and check the logs for errors and send me a pm @logread on the Domoticz forum with the description of the error(s) and copy of the relevant log entries.## Parameters:1. Inside Temperature Sensors: Enter the domoticz "idx" (i.e. device "number") of at least one temperature sensors. Multiple sensors can be provided in a comma separated format (e.g. 6,7,12) and the virtual thermostat will average their values to be used as ambient temperature. Note that if no inside temperature sensor is provided the virtual thermostat will switch itself off.2. Outside Temperature Sensors: Enter the domoticz "idx" (i.e. device "number") of one or more outside temperature sensors. Multiple sensors can be provided in a comma separated format (e.g. 14,15) and the virtual thermostat will average their values to be used as the outside temperature. Note that if no outside temperature sensor is provided the virtual thermostat will just ignore the outside temperature in its calculations.3. Heating Switches: Enter the domoticz "idx" (i.e. device "number") of at least one heater or boiler on/off switches. Multiple sensors can be provided in a comma separated format (e.g. 6,7,12) and the virtual thermostat will actuate all as required. Note that if no inside temperature sensor is provided the virtual thermostat will throw errors.4. Apply minimum heating per cycle [new in version 0.4.1]: Define behavior of thermostat when a minimum heating per cycle parameter is provided.1. If set to "only when heating required" (default option), then the minimum heating will only be applied when the desired temperature is not reached. This is for instance useful when driving central heating boilers that have a certain inertia.2. If set to "always" then the minimum heating at each heating/calculation cycle will always be applied, regardless of whether the desired temperature is reached. This is for instance useful for floor heating systems with very high thermal inertia, where it is better to avoid the floor cooling too much even if no heating is actually needed.5. Calculation cycle, Minimum Heating time per cycle, Pause On delay, Pause Off delay, Forced mode duration: Due to limitations of the domoticz python plugin platform, a number of additional parameters have been grouped in a single one, with comma separated values. This is unfortunately complex, but this line includes advanced parameters that can be critical to the proper operation of the smart virtual thermostat:1. Calculation cycle: This is the time in minutes between two thermostat calculations. This needs to be set depending on the thermal inertia of your physical room and heater system and might require some tweaking. Note for starters that the default 30 minutes appears well suited for a discrete electrical convectors setup and that 60 minutes or more value might be a better fit for a whole house conventional fuel or gas boiler central heating setup.2. Minimum Heating per cycle: This is the minimum % that the heater(s) must be on in a given calculation period (see above 'Apply minimum heating per cycle' parameter). Value can be from 0 to 100.3. Pause On delay: This is the number of minutes that the "Pause" switch must be on before the thermostat actually switches the heating off. This is very useful to allow a door to be opened briefly then closed again without any impact on the thermostat, while leaving a door open for a longer time would then cause the thermostat to switch off the heating to avoid wasted heating.4. Pause Off delay: Conversely from the previous parameter, the number of minutes that the "Pause" switch must be off before the thermostat resumes its normal operation.5. Forced mode duration: The time in minutes that the thermostat will force heating when the "Forced" mode is selected. After that duration, the "Auto" mode will be active.## Updating to last version:1. Open a shell session2. Navigate to the directory holding your Domoticz installation (typically ~/domoticz)3. Perform the following commands within the shell:```cd plugins/SVTgit reset –-hardgit pull --forcesudo chmod +x plugin.pysudo /etc/init.d/domoticz.sh restart```# Smart Virtual Thermostat[](http://www.antor.fr/apps/thermostat_80x80/?lang=en)[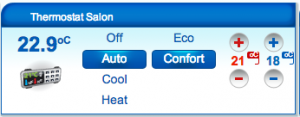](http://www.antor.fr/wp-content/uploads/2012/11/Capture-d’écran-2012-11-30-à-20.08.09.png)**Description :** Drive your heaters with indoor and optional outdoor temperature sensors.[Install](http://apps.mios.com/plugin.php?id=2968)[Donate](https://www.paypal.com/cgi-bin/webscr?cmd=_donations&business=LP83ZWHSLP8KY&lc=FR&item_name=AntorFR&item_number=Smart Virtual Thermostat¤cy_code=EUR&bn=PP-DonationsBF%3abtn_donate_SM.gif%3aNonHosted)With users from touteladomotique forum, we speak about lack of plugin to manage our heaters. With [Fatal25](http://translate.googleusercontent.com/translate_c?act=url&depth=1&hl=fr&ie=UTF8&prev=_t&rurl=translate.google.fr&sl=fr&tl=en&twu=1&u=http://touteladomotique.com/forum/memberlist.php%3Fmode%3Dviewprofile%26u%3D6363&usg=ALkJrhgYOJfnBeYJDFDlH8N5p51EDwuWcg) we started development to complete a first version published in early December 2012.# 1/ How it works[](http://www.antor.fr/wp-content/uploads/2012/11/Capture-d’écran-2012-11-30-à-20.08.09.png)Goal of thermostat is to regulate the temperature in a room (or area). It exists real thermostats (some in Zwave) , equipped with a temperature sensor and a control link to your heater. You tell it a setpoint and it drives the heaters to stay around.Here, this the same principle except thermostat is virtual and can drive from Vera (or your iPhone).## 1.1/ What do you need?A heater controlled by the Vera and a temperature sensor (which is also connected to Vera). I suggest you to use Oregon probes and RFXCOM USB module (eg [here](http://translate.googleusercontent.com/translate_c?act=url&depth=1&hl=fr&ie=UTF8&prev=_t&rurl=translate.google.fr&sl=fr&tl=en&twu=1&u=http://www.planete-domotique.com/nouveau-transceiver-usb-rfxcom-emetteur-recepteur-433mhz.html&usg=ALkJrhiIbuL2FMjav3Bk4AeaDb1_4wUDrA)). So you can **enjoy the decimal places** for temperature control.## 1.2 / basis functionsOnce set up correctly (we will how to setup later in the article). You will be able to control one or more radiators### Different modes:Thermostat can be in three modes:1. Off : Shutdown all heaters2. Auto : let plugin decided (based on the temperature) whether on or off heaters. This is the most common mode.3. Bypass : plugin is disabled. Useful to be able to operate your heater without this module.4. Heat : forced mode. put your heaters On (during forced mode duration).In Auto mode, plugin automatically decide, based on the temperature of the room and outdoor temperature (optional) heating duration necessary to achieve or maintain wishes temperature. To do that, once per hour (or when setpoint changes, etc.). Plugin calculates a percentage of heating. As an example (values are fictive) the temperature is 21° and the room temperature to 20.3°, plugin estimate a heat time of 25%. It turns On heaters during the first 15 minutes, then Off for next 45 minutes. After a hour, it restarts the calculation to estimate the need for next hour etc..This lets time to equilibrate room temperature’s before recalculating a heating duration. In this way it is independent of distance between temperature sensor and heater. Thus we limit number of changes of state of heater control modules.### Temperature setpoints:There are two setpoints: one for the comfort mode (red) and one for the Eco mode (blue). Depending on what mode is set, plugin uses it to calculate the heating duration (if of course you are in Auto mode). In case of change of setpoint or setpoint mode, heating time calcul is restarted without waiting for end of hour.It is possible to choose a decimal value to the instructions given through the full:[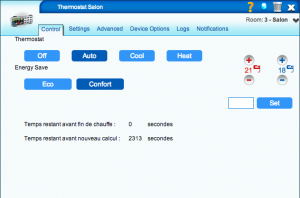](http://www.antor.fr/wp-content/uploads/2012/11/Capture-d’écran-2012-11-30-à-20.08.37.png)To do this, you must use the “Set” button for example with the value “20.5” (note the decimal point is the point).## 1.3 / Advanced functions### Auto learning :Each room (or area) has their own characteristics: thermal inertia – heating power – outside Insulation. Heating time required to reach the set temperature is specific to each of them. Plugin is continuously learning to calculate right heating time and thus do not consume more than necessary. At each end of the heating phase, plugin examines and adjusts coefficients. To avoid disturbances due to external heat sources, coefficient calculation is a weighted average of the last 50 learning. Therefore let several days (2-3) for the best fits plugin.For example, at home with default coefficient (60 inside and 1 outside), the average temperature of room was rather between 21.2° and 21.5°. After 3 days with auto learning,new constants are 49.7 for indoor and 2 outdoor.[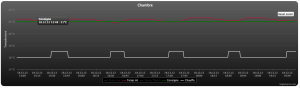](http://www.antor.fr/smart-virtual-thermostat/capture-decran-2012-12-19-a-21-40-00/)we can see each hour’s (yellow square), room temperature is 21 (= setpoint).temperature rises during the hour until 21.2° then reach 21°. But my probe is rather close to heater, so when temperature is averaged in the room, the perceived temperature is well 21°.### Shutdown when opening windows :It possible to add door sensors (or virtual switchs) to shutdown heaters.Il est également possible de choisir un délai avant la coupure et un délai avant la reprise. Ainsi si vous ouvrez et refermez la fenêtre durant un bref instant (inférieur à la durée du délai que vous aurez paramétré), le plugin ne coupera pas le chauffage. (idem pour la reprise, si vous fermez et rouvrez brièvement votre fenêtre alors que le module a été coupé suite à l’ouverture prolongée de la fenêtre)It is also possible to choose a delay before shutdown / resumption. So if you open and close the window for a short time (less than delay you set), the plugin will not cut heating.### Tempo forced mode:It is possible to choose to associate a time limit for forced mode. If a deadline is set, when you turn (manually or via a scene) the forced mode button (heat), a countdown begins. At the end of module automatically reverts to Auto mode.### Safety on temperature sensors:Security checks that temperature from your probes date less than 2 hours for inside temperature and 24 hours for outside temperature. Otherwise, the probe is skipped. If all probes are ignored, the plugin will consider that the room temperature is equal to set temperature and turn off heaters.So no problem if one of your sensors has no battery, there is no risk that the heaters remains active for hours## 2 / Installation and Configuration plugin## 2.1 / Installing the pluginJust go in *APPS* and *install applications* on *the* VERA, then download the module **Smart Virtual Thermostat** .[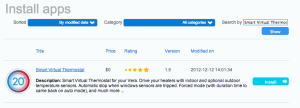](http://www.antor.fr/smart-virtual-thermostat/capture-decran-2012-12-23-a-13-31-15/)Once the installation is complete, a new module has appeared on your interface:[](http://www.antor.fr/2012/11/30/beta-thermostat-virtuel-pour-la-vera/capture-decran-2012-11-30-a-20-08-09/)Press the “Reload” your interface to restart the vera:[](http://www.antor.fr/wp-content/uploads/2012/07/Capture-d’écran-2012-07-15-à-12.34.05.png)After (a page refresh may be necessary), enter the advanced settings of the module.## 2.2 / Setup pluginOnce the module is created, here is the list of available settings:### Mandatory parameters:**Inside Temp Sensors:** Complete list of ID with your internal temperature sensors separated by commas. The plugin average all values.**heaters:** Complete list with the ID of your radiators separated by commas### Optional parameters:**Outside Temp Sensors:** Complete list of ID with your external temperature sensors separated by commas. The plugin average all values.**inhibit Sensors:** Complete with a list of your door sensors separated by commas. If you want to reverse the condition (switching off the heating if the sensor is 0) must put a minus before the id of the module. If at least one of the sensors is activated => heating off.**Waiting Time Open:** Duration of tempo seconds before switching off the heating if the sensor is activated**Waiting Time Close:** Time in seconds before the timer resumption heating if all the sensors are disabled**Forced Mode Duration:** Duration of forced mode before returning to automatic mode. XX: the second, XXm: in minutes (eg 30m) XXh: in hours (eg 1h).**PowerMin:%** minimum heating if the module believes it is necessary to heat (according to the temperature inside and outside)**Calculation period:** Time (in seconds) between two calculations of heating power (3600 by default)**ConstC:** This is the coefficient of heat inside. It depends on the size of your room and the heating capacity of your heater (60 by default)**ConstT:** This is the coefficient of external heating. It depends on the insulation part relative to the outside (1 by default)**AutoLearning:** This is a variable specific to self calibration. There is no need to touch it. Variable is made up as follows: X, Y1, Y2, T1, T2, P. X is the state parameter: 0 = uninitialized, 1 = initialized, 2 = disabled. Y1 and Y2 corresponds to number of learning for the constant respectively inside and outside the constant. when Y reaches 50 first learning is complete, but self-calibration continue. T1 and T2 are temperatures inside and outside at time of last calculation power. % P is calculated in the final calculation of power.